Have you ever said: “I deserve better than legacy code”?
Then this post will show you how you can start understanding the legacy code. To change it for the better.
It is often difficult to understand the intent of legacy code, which makes it even more challenging to make changes or updates. In addition, when there are multiple developers on a project, it’s not uncommon for them to unknowingly make changes that break the original functionality. That’s why characterization tests can be helpful when testing legacy code.
Characterization tests are tests that characterize how the application works at the moment. They don’t check whether or not the application works correctly. Their only purpose is to cover the existing behavior. You usually use them in testing the legacy code.
This post will teach you how to understand this type of testing better to use it in your software projects.
What are Characterization Tests?
The adage, “Don’t fix what isn’t broken” doesn’t apply when dealing with legacy code. Code that has been around for a while and has undergone many changes since it was first written can be hard to write a unit test as the developers working on it didn’t think about code testability.
The lack of tests for the legacy code can lead to large holes in your testing suite and problems with regression. To ensure that your changes do not break anything, it is crucial to test the code thoroughly. One way to do this is by using characterization tests.
Characterization tests will show you how legacy code behaves when faced with specific inputs. It can help you understand what the code does to know what to expect when executing it yourself. In addition, characterization testing can help you increase the code coverage of the older parts of the system.
When you are writing a characterization test, you are not looking for a specific bug. Instead, they are trying to describe with tests how the application works at the moment. This is a black-box testing technique, where you observe what happens with the output when you enter a specific input.
If you are familiar with regression testing, you might be wondering: what’s the difference between regression tests and characterization tests? Well, with regression tests, you make sure that the application still works correctly after making changes to it. However, with characterization tests, you are not focused on the correctness of the system. You don’t focus on the desired behavior according to the requirements. Instead, you make sure you capture with tests the actual behavior, even if that means there is a bug in the system.
In case you notice a strange behavior while writing characterization tests, you note that down and figure out later how to deal with it.
Why Do You Need Them?
Legacy code is a significant problem for many organizations. It’s often hard to understand how it works and what the potential risks are. What’s more, because it’s so old, it doesn’t always work as intended. This means that legacy code could pose a security risk or other difficulties to an organization. It can be hard to test legacy code thoroughly, and it may take a lot of time and effort.
QA can’t thoroughly test legacy code because it may not be possible for the tester to know all the scenarios. Or there is not enough time to check all scenarios when there is a change in that part of the code. This means that characterization tests are crucial in making sure you have a healthy system.
When you want to add new features
New features can be a lot of fun. But, before you add anything new to your application, you should evaluate the potential risk of changing the legacy code. Characterization testing gives you security so that you can safely change the unknown part of the code. You can refactor the code more safely when you know the code has some code coverage.
When you need to fix bugs
People need characterization tests to determine if the software is functioning as it was before touching the legacy system. But what if the legacy system doesn’t work correctly in the first place? What if it has a bug?
Well, again, characterization testing will save you. You can inspect the code and attempt to change it to fix the bug. If all characterization tests still pass after the change, great, you are almost done. Write a new test to cover the functionality you just fixed. The new test prevents the same bug from re-occurring in the future.
However, if you fix a bug but a characterization test fails, that could mean one of the two things:
- You have introduced another bug. Inspect your changes and change the code so that the new bug disappears.
- The characterization test covered the functionality that has a bug. In this case, update the assert part of the failing test to reflect the new and correct behavior.
Either way, characterization testing has saved you once again.
How To Create Them

Characterization testing can feel like experimenting. You perform a test and see what happens. The steps you should follow are the next ones:
- First, identify the code you want to test.
- Then, create a test method with a dummy name, which can be as simple as Test1 (don’t worry, you will change it later).
- Create the most straightforward possible assert for a given input, provide a default or null value as the expected output.
- Run the test. Most likely, it will fail. Then, inspect the failure message to see what should be the actual expected output.
- Change the assert and rerun the test. It should pass now.
- Update the name to reflect the behavior of the code under test.
- Repeat.
Let’s take a look at one example
Code example
The following code shows the program for calculating the salary in a company:
public class SalaryProgram
{
    private decimal _belowTaxSalaryAmount;
    private decimal _taxPercentage;

    public SalaryProgram(decimal belowTaxSalaryAmount,
                         decimal taxPercentage)
    {
        _belowTaxSalaryAmount = belowTaxSalaryAmount;
        _taxPercentage = taxPercentage;
    }

    public decimal CalculateNetAmount(decimal grossSalaryAmount,
                                      decimal higherSalaryAmount)
    {
        if (_belowTaxSalaryAmount == 0 || _taxPercentage == 0)
        {
            return grossSalaryAmount;
        }

        decimal taxSum = 0m;

        if (grossSalaryAmount <= _belowTaxSalaryAmount)
        {
            return grossSalaryAmount;
        }
        decimal tax = (grossSalaryAmount - _belowTaxSalaryAmount)
                        * (_taxPercentage / 100);
        taxSum += tax;

        decimal taxableSalary = grossSalaryAmount;

        if (taxableSalary > higherSalaryAmount)
        {
            taxableSalary = higherSalaryAmount;
        }

        tax = (taxableSalary - _belowTaxSalaryAmount)
                * (_taxPercentage / 100);
        taxSum += tax;

        return grossSalaryAmount - taxSum;
    }
}
The SalaryProgram class takes 2 constructor parameters, belowTaxSalaryAmount and taxPercentage. The CalculateNetAmount method calculates the net amount an employee is going to get, based on the gross salary amount and the higher salary amount.
Imagine you have to make some changes to this code. Scary, right? Because if you make a mistake, employees can get the wrong net amount. Ouch!
At the moment, it’s hard to know how exactly does the code work, just by looking at the code. The manual way to testing it would be to run the application, find the screen that uses this code, and try inputting different values. Based on the input, observe what’s the output and learn more about how the code works.
However, what we will do in this case is to write a characterization for the code. You start by creating a unit test case with a default name.
[Fact]
public void Test1()
{

}
Next, create the test with some inputs. In the assert statement, set the expected result to be zero.
[Fact]
public void Test1()
{
    var salaryProgram = new SalaryProgram(1000, 23);

    var netAmount = salaryProgram.CalculateNetAmount(2000, 3000);

    Assert.Equal(0, netAmount);
}
Run the test and watch it fail.
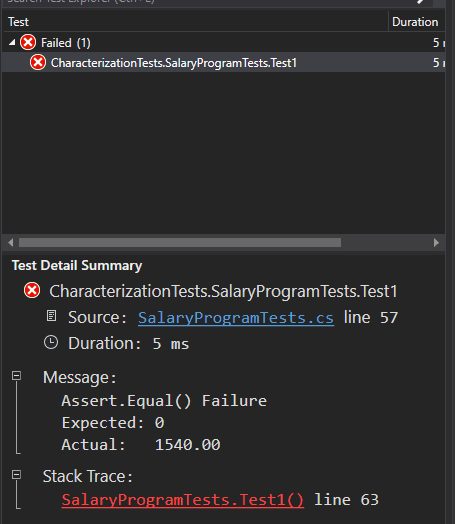
Finally, adjust the expected result in the Assert.Equal and rename the test.
[Fact]
public void CalculateNetAmount_returns_1540_for_2000_gross_amount()
{
    var salaryProgram = new SalaryProgram(1000, 23);

    var netAmount = salaryProgram.CalculateNetAmount(2000, 3000);

    Assert.Equal(1540, netAmount);
}
At this point, you would continue to write more characterization tests.
Next steps
The next step after writing characterization tests would be to fix the bug or implement the feature, depending on what your task is. One piece of advice I would give to you is to refactor your code before or while making the changes. After you refactor, you will more easily make the necessary changes.
How to know when you are done with characterization testing?
Obviously, you can’t spend unlimited time working on these tests. So at some point, you need to stop and move on with the actual task.
It’s not always easy to know when you are done with characterization testing. It’s almost like a fine line between good and bad, and you don’t want to get too arrogant and say “yes, we’re done” and then realize you still haven’t covered all the critical execution paths.
Some approaches you can take are:
- Inspect the code and see if the most important branches are covered – Even though you should treat characterization tests like black-box testing, that doesn’t mean you can’t take a look at the code and see its structure. Inspect the code, see if you have covered the main execution paths. If you have, excellent, you are done for now. Move on with the actual work.
- Cover only the code you need to change – It might be tempting to cover different system areas with the characterization tests. The more, the better, right? Well, yes, but you always have a time limit you can spend on writing characterization tests. For that reason, don’t focus on width. Focus on depth. The depth means that you only write the characterization tests for the area you are about to change.
Advantages and disadvantages of characterization tests
Characterization tests offer several advantages over other forms of testing but also have some disadvantages.
Advantages of the characterization testing
There are several advantages of characterization testing. The most important are listed below:
- It helps you to understand how the system works correctly.
- It reduces the risk of breaking the system.
- It helps to write tests for situations that occur in real life.
- It helps you to identify errors and bugs.
- It helps you to refactor the code.
The last point is crucial since refactoring can improve the health of your codebase and prevent the rewriting of the whole application.
Disadvantages of the characterization testing
Characterization tests are often the only way to combat the legacy code. However, even though characterization testing is helpful, it has some downsides:
- Tests can be hard to maintain because they can be complicated – The classes in the legacy code can be challenging to set up and use in tests.
- Time-consuming to write the tests – It takes time to write the tests.
- Confusing to interpret the results – When you are just starting in an unknown system, it can be confusing to interpret the test results.
- Preparation of the test environment – These tests are often integration tests and require that you have a test database and test API endpoints.
However, sometimes you need to make short-term sacrifices for a better long-term product.
Conclusion
Characterization tests will let you know what your application is doing and can be a great way to improve its coverage. They can be particularly useful in guiding legacy code that doesn’t have any automated tests.
If you struggle with the legacy code, this blog post should help you in implementing characterization tests! And the next step is reading the article about legacy code, it has an action plan you can follow to get rid of legacy code.