Do you want to find bugs in your code?
Sounds like a silly question, doesn’t it? Of course, you want to find bugs.
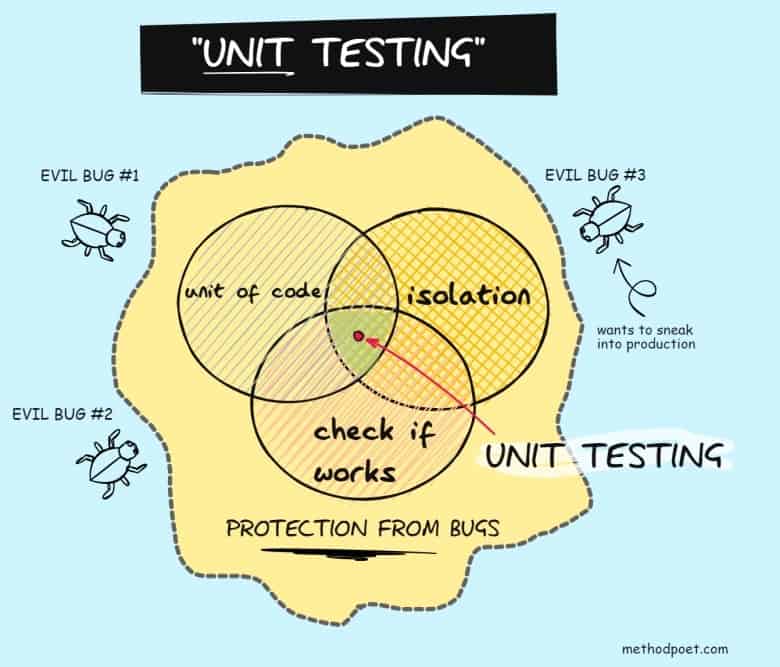
That’s why you use unit tests.
But what about bugs and holes in unit tests? After all, if you have any doubts about the tests, how can you trust them?
Well, for testing the tests, you can use mutation testing
Mutation testing is the process of running automated software tests against code that has been modified by introducing a mutation to identify potential gaps in the unit testing suite. If all tests pass after introducing mutation, there is likely a missing unit test case.
Even though is less known and less used, mutation testing can improve your unit testing efforts.
This article focuses on mutation testing in C# and gives some insight into this topic. If you are not familiar with this testing technique, then keep reading as we explain what it is and why you should use it.
What is mutation testing?

In software development, every line of code is important.
That’s why it’s so easy for bugs to creep in unnoticed and uncorrected. That’s also why detecting and eliminating bugs early before they cause any harm is a crucial part of software development.
Software developers use different types of testing to try their best to prevent bugs from creeping in before they are released into production.
One type of testing that software developers often forget about is mutation testing. Mutation testing is similar to unit testing. But instead of testing the code by writing test cases specifically for the purpose, mutation testing involves changing one or more small parts of the app at a time until it has been completely tested again without introducing any new bugs to the codebase.
Mutation testing is software testing in which you introduce changes or ‘mutants’ for certain statements of the source code and test if the test cases you have written to test them can identify such errors.
After introducing a mutant, you run your original unit test case against that mutant code. If one or more test cases fail, your test suite has been able to “kill the mutant”, indicating that your test case is effective or able to identify that bug.
If all the test cases, the mutant has been able to “survive”. That indicates that there is no unit test that can detect that error, and that’s an issue. To resolve this, you need to add new tests or update the existing tests to cover the failing scenario.
The higher the number of mutants your test cases can kill, the more robust and effective your unit test suite will be.
Therefore, mutation testing aims to determine the quality and robustness and increase the test coverage of your unit test suit for all the possible bugs that could arise from your tested software code. However, you must ensure that the changes you introduce do not affect the whole code. Thus, keep the mutants as small as possible.
There are several different types of mutants you can introduce for mutation testing. The most common type of mutants are:
- Mutating values – Changing the value of a variable to detect errors in the program. The most common strategy is increasing or decreasing the ideal value.
- Mutating logical operators – In this type of mutation, you can change the conditional statements to check issues in decision flows using inverses of the logical operators. For example, if the condition checks a value == something, you can replace it with value != something.
- Changing the execution order of the statements.
- Mutating statements – Deleting or duplicating code statements that simulate errors in copy-pasting the code from somewhere else.
For example, if you have an expression in the code:
a + b
the mutation testing will change that temporarily to:
a – b
and execute the tests.
How to perform mutation testing in C#?
Introducing mutations for code is extremely difficult and time-consuming, especially if the number of mutants is too large. In C#, you can use the Stryker library to introduce changes to source code automatically.
Then, the Stryker library uses the above-mentioned techniques to mutate the source code and test the effectiveness of the unit tests.
The following table shows some of the mutations in the code:
| Original operation | Mutated operation |
| + | – |
| – | + |
| * | / |
| < | > |
| != | == |
| && | || |
| true | false |
How to use Stryker for mutation testing in .NET
What exactly is Stryker?
Stryker is an easy-to-use, open-source tool that you can use to introduce mutants for production code written in Javascript, Scala, and C# automatically. Stryker.NET is the version you can use for projects written in .NET Core and .NET.
It supports more than 30 mutation types and produces results in a readable HTML format. You will soon see what that looks like.
Furthermore, you can use code analysis and parallel test runner processes to make the testing faster. Finally, as a bonus, Stryker will also provide a code coverage metric.
How to install Stryker
You can install Stryker.NET either globally for the whole system or only locally for your project.
Global installation:
dotnet tool install -g dotnet-stryker
Local installation:
First, create a tool manifest for creating a dotnet-tools.json file by running the following command in your root folder. It will create a new folder called .config, which includes the dotnet-tools.json file.
dotnet new tool-manifest
Then install the Stryker.NET without the -g option as follows.
dotnet tool install dotnet-stryker
After the successful installation, you can run the following command to execute mutation tests in the TEST PROJECT FOLDER.
dotnet stryker
Mutation testing – Example
Let’s understand how to use this tool to write mutation tests using an example.
Below is a sample code that declares a class with one function that divides two numbers together and returns the result.
First, create a new C# project called MutationTesting as a Class Library type. Then and add a new class called MathOperations. Delete any other C# classes that were created by default.
namespace MutationTesting;

public class MathOperations
{
    public static int Division(int a, int b)
    {
        if (b != 0)
        {
            return a / b;
        }
        else
        {
            return 0;
        }
    }
}
Next, let’s create a test project to test the above function. Create a Test Project MutationTesting.Tests (see this article for more on naming conventions).
Then create a new test class, or rename the UnitTest1, and name it MathOperationTests.
Add a reference to the MutationTesting project and add the following test method.
namespace MutationTesting.Tests;

public class MathOperationTests
{
    [Fact]
    public void Simple_division_should_return_correct_result()
    {
        var actualValue = MathOperations.Division(100, 20);
        Assert.Equal(5, actualValue);
    }
}
The test method checks the simple division using 100 and 20 as input parameters.
Ok, now you are good to do the mutation testing with Stryker. Use the following command to run the mutation test.
IMPORTANT: Ensure you are in your test project path when executing this command.
dotnet stryker
The Stryker will then automatically generate the mutants and generate the following output.
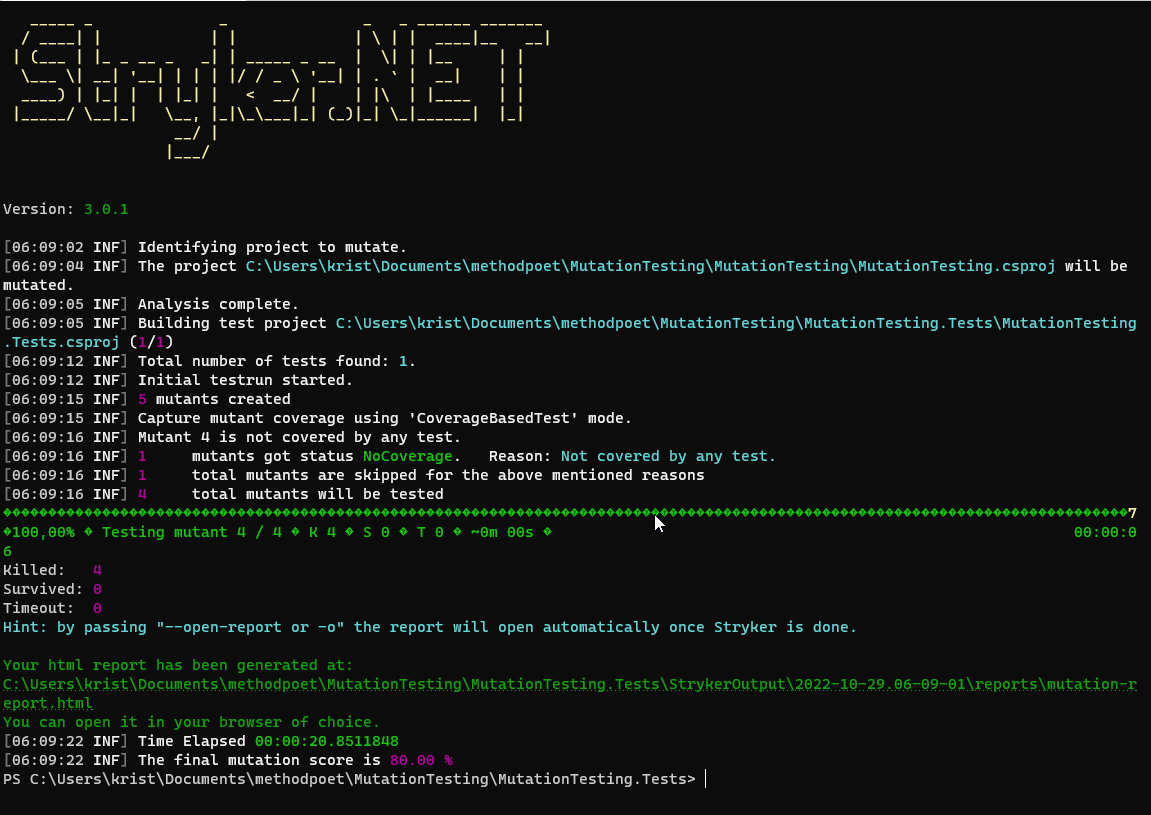
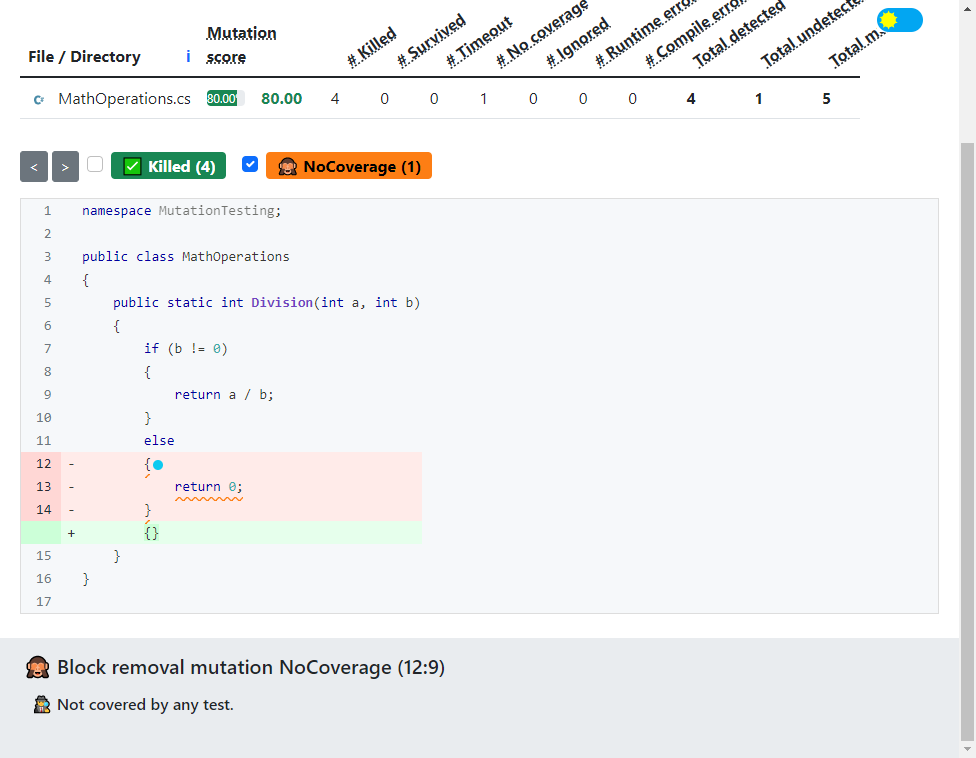
As you can see from the above output, Stryker has found the correct project for mutation. It provides useful information like the number of killed, survived, and timed-out mutants as a summary. At the end of the execution, it generates a report with a visual summary of all the mutated files with other details like compilation errors, ignored, no coverage, etc.
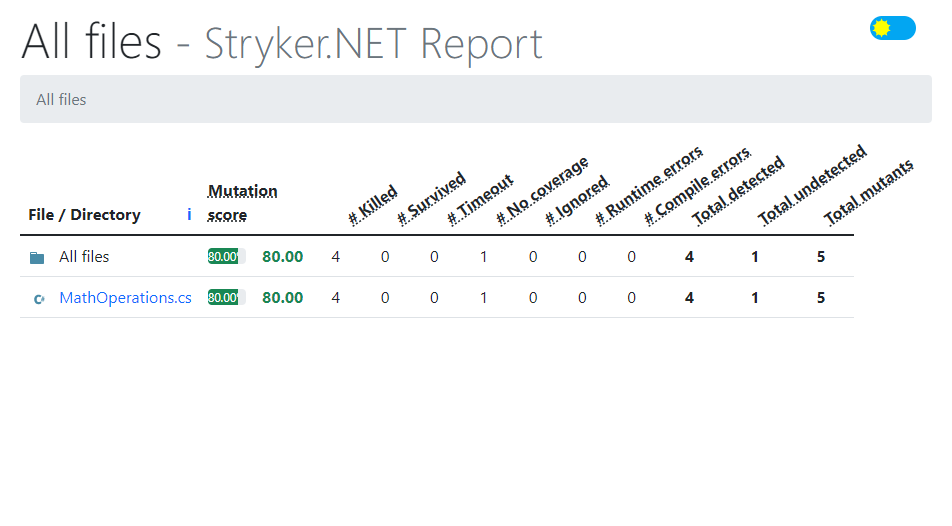
The following image shows the generated report.
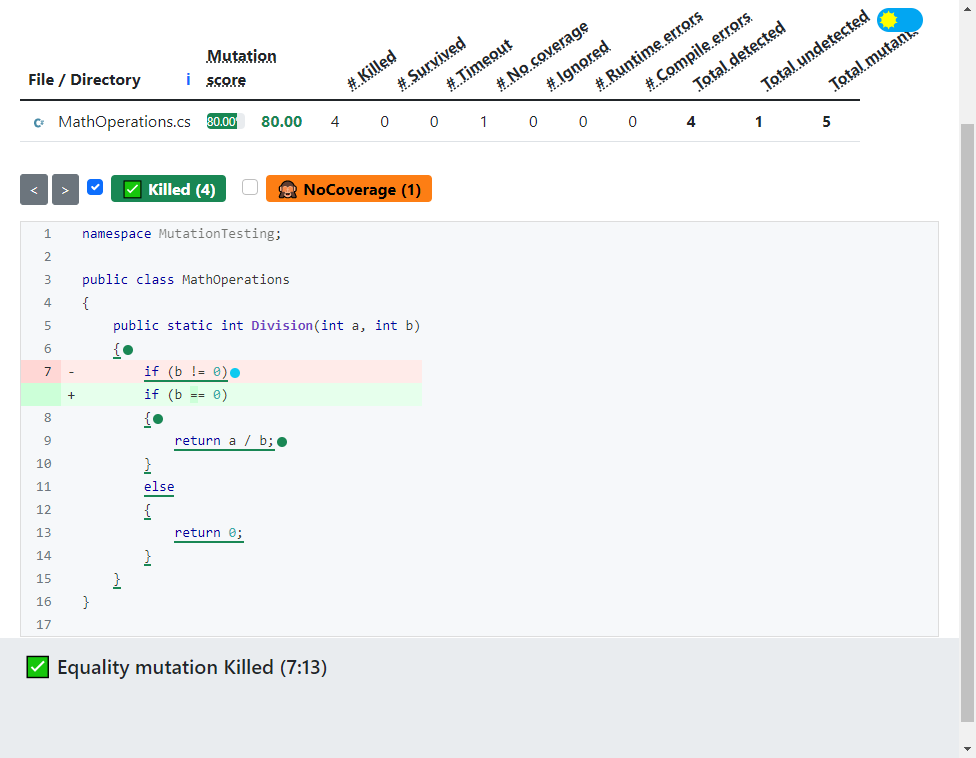
Clicking on the MathOperations.cs file will show you the source code with all the mutants:
- Green dots indicate the killed mutants.
- The survived mutants will be in red dots.
- The code with no coverage will be indicated by orange dots.
The mutation score for the test class is 80%. The higher the mutation score, the better your unit test are.
Even though you should not be aiming in real-world projects for 100% code coverage, here we will do that.
Add the following test.
[Fact]
public void Simple_division_returns_zero_when_divisor_is_zero()
{
    var actualValue = MathOperations.Division(100, 0);
    Assert.Equal(0, actualValue);
}
Run the Stryker again.
This time, there is one surviving mutant.
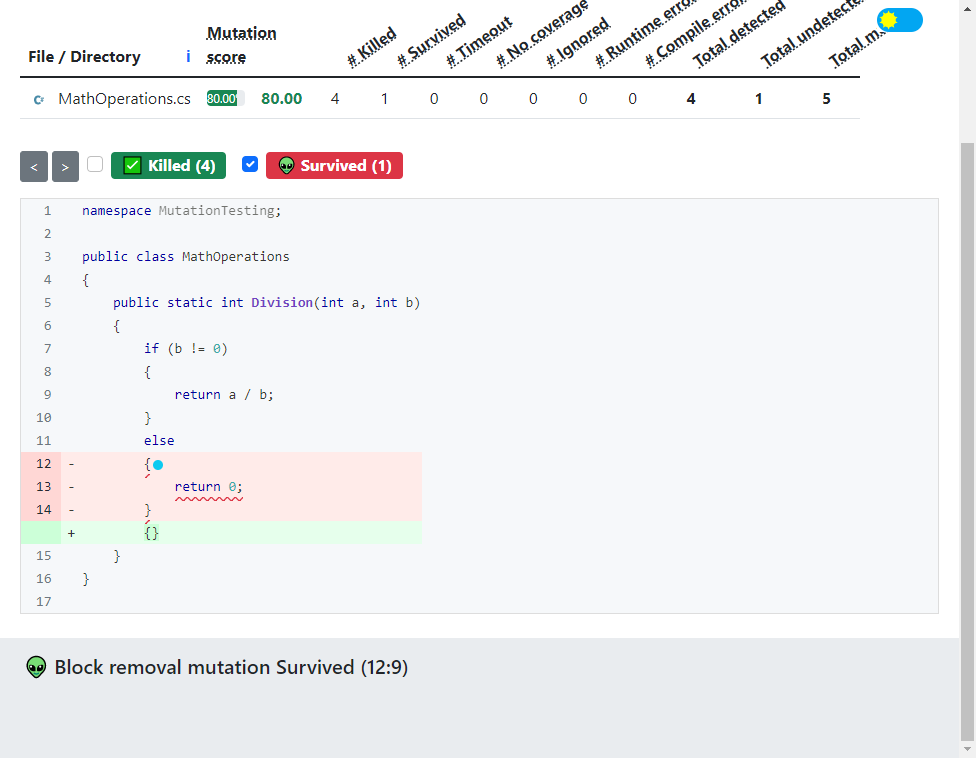
This looks like a false alarm. But nevertheless, it indicates that the code can be improved. You see, the else statement is not necessary in this case. So it’s safe to remove it. The following is the final look of the MathOperations class.
public class MathOperations
{
    public static int Division(int a, int b)
    {
        if (b != 0)
        {
            return a / b;
        }
        return 0;
    }
}
As you can see from the following image, all the mutants have been killed, and the mutation score has now become 100%.

Now that you have learned what mutation testing is and how you can do it using the Stryker.NET tool, let’s move on to understand another type of software testing called property-based testing.
Stryker advanced configuration
If you want to configure your Stryker runs, you can create a configuration file. It usually contains advanced settings to fine tune your mutation test runs. Example of stryker-config.json config file:
{
    "stryker-config":
    {
        "solution": "../OrderManagement.sln",
        "project": "OrderService.csproj"
    }
}
In the above code, “solution” parameter point to the path where solution file is. It is a required parameter option for .NET framework solutions. “project” refers to the project file and it is required when your test project references more than one project.
Some other useful options are:
- test-projects
- mutate
- mutation-level
Conclusion
So, you have learned about mutation testing, what it is and why you should use it. You have also learned how to use Stryker.NET to make the process easy and effective.
Although mutation testing is not a new concept or technique, it is still not widely used in the industry. As a result, many developers are not familiar with this type of testing. If you are interested in applying this technique to your existing .NET projects, you can find more information about Stryker on GitHub.
Lastly, if you want to learn more about unit testing and how you can use it to improve the quality of your C# code, then you can check out the tips in this article.