Async methods are a great way to improve the performance of your applications by running tasks in the background. However, unit testing async methods in C# can be tricky.
When writing unit tests for async methods, you must use the async Task keyword in the method signature. This will allow your unit test to call the method asynchronously and wait for the result. Also, any exception thrown during method execution will be correctly caught and can be processed.
In this blog post, you will easily learn how to unit test an async method in C#. We will also discuss some challenges you may face when unit testing async methods. Let’s get started!
What is the purpose of asynchronous programming?

When working on an application, one of the most common things you need to test is the methods that execute asynchronously. For example, if a user makes a payment, he wants to know when the payment is processed. Or, an API call returns data, and this method is invoked after the response has been received. These are just a couple of common examples where async methods come into play.
Async methods have become extremely popular over the last few years. They allow developers to write code more naturally by separating blocks of code that don’t return until later.
How to unit test async method in C#?
When it comes to unit testing a method that performs an asynchronous task, there are a few things that you need to have in mind to do it successfully.
To explain what I mean, let’s take a look at one simple code example:
public class TransactionViewModel
{
    //1
    private IWalletController _walletController;

    //2
    public TransactionViewModel(IWalletController walletController)
    {
        _walletController = walletController;
        Transactions = new List<Transaction>();
    }

    public List<Transaction> Transactions
    {
        get;
        set;
    }

    //3
    public async Task GetTransactions()
    {
        var transactions = await _walletController.GetTransactions();
        Transactions = transactions;
    }
}
The code explained:
- TransactionViewModel has one dependency, IWalletController
- TransactionViewModel gets its dependency through the constructor. In the constructor, the Transactions property is also initialized.
- We will test the GetTransactions method. It calls the GetTransactions method of the IWalletController and saves the result into the Transactions property.
The IWalletController interface looks like this:
public interface IWalletController
{
    Task<List<Transaction>> GetTransactions(bool forceReload = false);
    Task<List<Coin>> GetCoins(bool forceReload = false);
}
The first mistake that you can make is to have the unit test method defined as void, and we don’t await the transactionViewModel.GetTransactions(). This is the test written using xUnit and moq:
[Fact]
public void this_test_should_fail()
{
    var _mockWalletController = new Mock<IWalletController>();
    var transactionViewModel = new TransactionsViewModel(_mockWalletController.Object);

    transactionViewModel.GetTransactions();
}
In case the GetTransactions method has an error in it, let’s say we throw an exception:
public async Task GetTransactions()
{
    var transactions = await _walletController.GetTransactions();
            throw new Exception("This should fail in test.");
    Transactions = transactions;
}
the test will incorrectly pass.
Why?
Because the unit test method lacks an async Task and we need to wait for the execution using await. You see, the Task type is important to capture the asynchronous method execution context. Only with it the unit test will pass or fail correctly.
Please note that including only async and await is not enough. This test will correctly fail if you use xUnit (notice the async void in the method signature):
[Fact]
public async void this_test_should_fail()
{
    var _mockWalletController = new Mock<IWalletController>();
    var transactionViewModel = new TransactionsViewModel(_mockWalletController.Object);

     await transactionViewModel.GetTransactions();
}
But the MS Test Framework won’t even execute it.
[TestMethod]
public async void this_test_should_fail()
{
    var _mockWalletController = new Mock<IWalletController>();
    var transactionViewModel = new TransactionsViewModel(_mockWalletController.Object);

    await transactionViewModel.GetTransactions();
}
Why is that? Again, we are missing the Task as a return type to capture method execution.
Essentially, async void methods should be avoided in almost all cases. This is because they execute in a fire-and-forget manner. As a result, any exception thrown while executing async void methods will be swallowed and completely ignored.
In the case of the xUnit, it uses a bit of magic under the hood and provides support for async void methods using SynchronizationContext. As per the documentation comment in the xUnit library:
This implementation of SynchronizationContext allows the developer to track the count of outstanding “async void” operations, and wait for them all to complete.
The same test in NUnit
[Test]
public async void this_test_should_fail()
{
    var _mockWalletController = new Mock<IWalletController>();
    var transactionViewModel = new TransactionsViewModel(_mockWalletController.Object);

    await transactionViewModel.GetTransactions();
}
will even fail to compile.
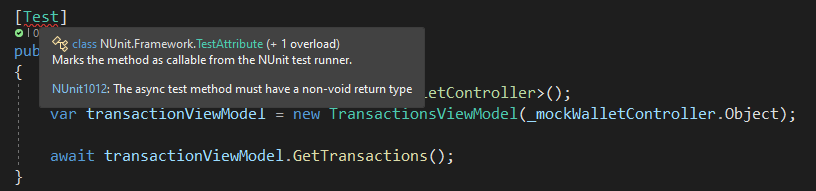
It fails with an error:
NUnit1012 – The async test method must have a non-void return type.
Conclusion
So there you have it – a quick guide to unit testing async methods in c#. By following these simple steps, you can ensure that your async methods are functioning correctly before moving on to the next development phase.
In case you need more help while writing stubs and mocks using Moq, I have a comprehensive article that will show you practical examples of how to unit test asynchronous code with Moq.