Let’s say you are a student at one of the prominent computer institutions where you intend to learn the C# programming language.
Then one morning, the programming tutor threw a question to the whole class, daring to punish the entire class if no one got the correct answer.
There was a great fright in the class as 7 students could not answer the question accurately, and you were next.
From the events in the classroom, remember that you can save the class from the wrath of the class teacher if your answers are correct. To represent this scenario in a computer program using C#, you will need the Chain of Responsibility design pattern.
The Chain of Responsibility design pattern is a behavioral design pattern that allows an object to send a request to a chain of other objects to find the object that can best handle the request. You can easily add new handlers to the chain without modifying the existing code.
The continuous process of seeking a solution to a problem until you find one is precisely why the Chain of Responsibility design is so well-known. It is a systematic approach to finding answers to a specific issue by exploring several options.
But continue reading to understand the Chain of Responsibility pattern in C# with real-life examples.
What is the Chain of Responsibility design pattern?
The Chain of Responsibility design pattern describes the connection between a series of sequential components. It is a behavioral design pattern that permits the transmission of requests down a chain of potential handlers. The program breaks after one of these handlers provide the request’s solution.
This design pattern enables an object to send a request to the chain of objects. The chain then tries to handle the request. This happens successively as each component that receives the request tries to handle it. If it fails, it passes the responsibility to the next object in the chain. Again, it doesn’t examine whether the object after can handle the request; instead, it simply transfers the request to the subsequent object without taking that into account.
You could say that it depends on turning specific behaviors into independent objects called handlers. Then, the requests and their content can travel as arguments down to the next handler without using a sender class and a set of particular receiver classes.
Therefore, whatever request the sender makes will offer several objects a chance to handle it. Let’s imagine there are four or five handlers in the chain. In essence, every object has a chance to find a solution.
Due to its chain structure, in which several objects attempt to process a request sequentially, this design pattern can readily resolve issues. These include issues you may find difficult to resolve with inheritance in C#.
When to use the Chain of Responsibility design pattern?
The Chain of Responsibility design pattern is your best bet when developing a project where multiple objects can handle a request. This is because determining the handler happens during runtime and need not be a specific object.
You can also use the Chain of Responsibility design pattern in the following situations:
- When you are writing a program that demands that many objects respond to a request.
- You want to send a request, but you don’t know who will handle it.
- You want to link the handlers in the chain in any sequence where there is a dynamic collection of objects that can respond to requests in a specific order.
- When your program intent is for the order and set of handlers to change as the program runs.
- When you want to request one of several objects without specifying the recipient in advance.
- When you want to distinguish between a request’s sender and recipient but don’t want to reference handlers in your code explicitly.
Who are the participants of the Chain of Responsibility pattern? – Structural code in C#
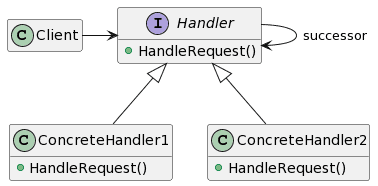
Generally, there are three major participants in the Chain of responsibility design pattern. They include:
- Handler – An interface handler declares the interface, executes the processing, and then determines whether to send the request to a subsequent handler. In general, handlers are self-contained and immutable, taking all relevant data just once via the constructor while typically only having one function for processing requests.
- ConcreteHandler – The actual implementation for handling requests linkable in some fashion. Concrete handlers will choose whether to handle the request or forward it to the next handler.
- Client – The actual code that sets up the chain and sends the request to it.
Let’s see how to implement it in C#.
public interface IHandler
{
    void SetTheNextHandler(IHandler handler);
    void Process(Request request);
}

public class Individual
{
    public string Name { get; set; }
    public int Age { get; set; }
}

abstract class BaseHandler : IHandler
{
    protected IHandler _nextHandler;

    public void SetTheNextHandler(IHandler handler)
    {
        _nextHandler = handler;
    }

    public abstract void Process(Request request);
}

public class Request
{
    public Individual Data { get; set; }
    public List<string> ValidationMessages;

    public Request()
    {
        ValidationMessages = new List<string>();
    }
}

class MaxHandlerForAge : BaseHandler
{
    public override void Process(Request request)
    {
        if (request.Data.Age > 60)
        {
            request.ValidationMessages.Add("Invalid age range");
        }

        if (_nextHandler != null)
        {
            _nextHandler.Process(request);
        }
    }
}

class MaxHandlerForNameLength : BaseHandler
{
    public override void Process(Request request)
    {
        if (request.Data.Name.Length > 12)
        {
            request.ValidationMessages.Add("Invalid name length");
        }

        if (_nextHandler != null)
        {
            _nextHandler.Process(request);
        }
    }
}
And the usage:
Individual individual = new Individual()
{
    Name = "Article Writer: Nitro",
    Age = 65
};

Request request = new Request() { Data = individual };

var maxHandlerForAge = new MaxHandlerForAge();
var maxHandlerForNameLength = new MaxHandlerForNameLength();

maxHandlerForAge.SetTheNextHandler(maxHandlerForNameLength);
maxHandlerForAge.Process(request);

foreach (string displayMsg in request.ValidationMessages)
{
    Console.WriteLine(displayMsg);
}
Output:
Invalid age range
Invalid name length
Chain of Responsibility pattern – Real-world example in C#

Imagine you work for a manufacturing company where the power generation system has recently been experiencing significant problems. As a result, a new power supply system also needs to be purchased, but because the corporation has certain protocols it adheres to, there is a delay:
- If the budget is less than $15,000, the technical team’s captain must first approve the acquisition. Anything above that, however, necessitates submitting a proposal to the general manager before buying a new power generator.
- If the budget exceeds $30,000, the cashier must then get in touch with the CEO.
- Finally, the CEO chooses whether the business uses cash on hand or obtains a bank loan.
From this example, you can quickly pinpoint the role of the Chain of Responsibility design pattern if you get the task to model this using C#.
Let’s try modeling this using the Chain of Responsibility pattern.
class GadgetPurchase
{
    public GadgetPurchase(string name, double amount)
    {
        RequestType = name;
        ProposedAmount = amount;

        Console.WriteLine($"Purchase request for {RequestType} " +
            $"for ${amount} has been submitted.");
    }

    public string RequestType { get; set; }
    public double ProposedAmount { get; set; }
}
Now that we have it in place let’s construct an abstract class for the approver, which is the Handler in this case. This represents anyone in the Chain who has the authority to approve requests.
abstract class Approver
{
    protected Approver _approver;

    public void SetNextApprover(Approver approver)
    {
        _approver = approver;
    }
    public abstract void ProcessRequest(GadgetPurchase purchase);
}
Let’s now create a ConcreteHandler object for every link in the chain.
class TechManager : Approver
{
    public override void ProcessRequest(GadgetPurchase purchase)
    {
        if (purchase.ProposedAmount < 15000)
        {
            Console.WriteLine($"{this.GetType().Name} approved: " +
                $"{purchase.RequestType}");
        }
        else if (_nextApprover != null)
        {
            _nextApprover.ProcessRequest(purchase);
        }
    }
}

// second concrete Handler class
class GeneralManager : Approver
{
    public override void ProcessRequest(GadgetPurchase purchase)

    {
        if (purchase.ProposedAmount < 30000)
        {
            Console.WriteLine($"{this.GetType().Name} approved: " +
                $"{purchase.RequestType}");
        }
        else if (_nextApprover != null)
        {
            _nextApprover.ProcessRequest(purchase);
        }
    }
}

// third concrete Handler class
class CEO : Approver
{
    public override void ProcessRequest(GadgetPurchase purchase)

    {
        if (purchase.ProposedAmount < 45000)
        {
            Console.WriteLine($"{this.GetType().Name} approved: " +
                $"{purchase.RequestType}");
        }
        else
        {
            Console.WriteLine("Purchase request " +
                "requires a Bank Loan !");
        }
    }
}
Finally, we need a Client participant, which in this case is the code that connects all the parts.
//Create the chain links
Approver tech = new TechManager();
Approver generalManager = new GeneralManager();
Approver ceo = new CEO();

tech.SetNextApprover(generalManager);
generalManager.SetNextApprover(ceo);

// Generate and process purchase requests
var purchase1 = new GadgetPurchase("Power Generators", 15882);
tech.ProcessRequest(purchase1);

var purchase2 = new GadgetPurchase("IDEA GENERATOR", 28526);
tech.ProcessRequest(purchase2);

var purchase3 = new GadgetPurchase("Industrial generators", 45099);
tech.ProcessRequest(purchase3);

// Wait for the user
Console.ReadKey();
Output:
Purchase request for Power Generators for $14882 has been submitted.
TechManager approved: Power Generators

Purchase request for IDEA GENERATOR for $28526 has been submitted.
GeneralManager approved: IDEA GENERATOR

Purchase request for Industrial generators for $45099 has been submitted.
Purchase request requires a Bank Loan !
What are the Advantages of Using the Chain of Responsibility Pattern?
Utilizing the Chain of responsibility design pattern has some clear benefits. They consist of:
- It is flexible in responsibility distribution and effectively reduces coupling.
- It guarantees that while maintaining direct references to its members, the object need not be concerned about the chain structure.
- It is simple to alter the Chain’s members or their positions and add or remove responsibility dynamically.
- It proposes a more practical method to speed up the processing of requests for a new class.
What are the disadvantages of using the Chain of Responsibility pattern?
Also, there are some downsides to the Chain of Responsibility pattern:
- Because a request might not have an explicit recipient, there is no assurance that it will be processed. Thus, the handling is not guaranteed.
- It can be challenging to see the runtime properties when debugging code.
- Sometimes the system’s performance will be impacted, causing the request to slip off the end of the chain without ever being addressed.
- Unhandled requests can be the result of poor chain configuration.
What is the difference between the command or message Object used in Chain of Responsibility and Command design patterns?
A Chain of Responsibility is an object trying to handle something and, if not, passing it on to the next one in the ‘chain’ until a specific object handles it. In the Chain of responsibility pattern, you do not have the chance to undo, save, or queue the actions.
On the other hand, the Command pattern is a behavioral design pattern that enables you to utilize an object to hold all of the data that will later trigger an event. By dividing the classes of the object with the operating skill, you can implement deferred execution of operations.
Furthermore, since it guarantees a lifespan separate from the initial request, you can queue, specify, and carry out operations at different times.
What is the difference between Chain of Responsibility and Decorator patterns?
The Chain of Responsibility is a design pattern that defines a communication path between objects so that each object knows what to do when a request gets to it. The Decorator pattern is a software design pattern that can extend the class’s functionality without altering its behavior.
You can use the Chain of Responsibility pattern when the solution contains classes that you can put in a chain. Each class can either handle a request or pass it up the chain. Because each link in a chain depends on the previous link, it is possible to think of links operating one at a time.
When you want to give an object additional functionality, you can use a decorator. Each decorator has a different action it can perform. Using a decorator, you can dynamically add new obligations to an object. They offer an adaptable substitute for subclassing for adding functionality. This design pattern, which falls under the category of a structural pattern because it serves as a wrapper around the current class, allows for additions to existing objects without changing their structure.
Conclusion
By offering several objects the option to complete a specific request, the Chain of Responsibility design aims to prevent the allocation of a request to a certain recipient. Furthermore, as it liberates an object from knowing which other object is in charge of handling a request, you can use it to achieve loose coupling in program design.
The examples in this article should help you determine when to apply the Chain of Responsibility design pattern.
If you want to learn more about design patterns, check the separate in-depth article about design patterns in C#.